
Here’s a concise introduction to home fermenting, dehydrating, and preserving — beneficial and economical age-old techniques for today’s cooks.

Though convenient, processed foods don’t offer the nutritional value and benefits of the foods our ancestors prepared to sustain themselves. Fortunately, many of these previously popular dishes — like fermented foods and fruit preserves — are easy to make in your own kitchen, given today’s access to a wide variety of foods and cooking gadgets.
Whether you prepare these foods using old-world methods or you prefer to rely on your cool, modern kitchen gear, you can enjoy these delicious eats — and all of their health and money-saving benefits — any time.
A Brief History of Old-World Food Preservation
Start your foray into preservation with a solid understanding of how people ate before the advent of the refrigerator, freezer, and modern-day preservatives. Back then, cooks preserved food naturally, using techniques passed down through generations.
The history of food preservation predates civilization. There’s archaeological evidence that early cave dwellers used the heat of fire or the sun to dehydrate foods, and Mesopotamian civilizations are known to have practiced salting foods before storing.
Although the practice of canning wouldn’t achieve popularity until the 1800s, naturally preserved foods like sauerkraut, pickles, chutneys, jellies, and jams were dietary staples for generations past. People filled their pantries with these items for the long winter months so that they could enjoy a variety of foods, even when they weren’t in season.

Advantages of Fermenting, Dehydrating, and Preserving Your Own Foods
There are many advantages to revisiting old preservation methods — albeit with a few modern updates.
Convenience. While it can be time-consuming to prepare foods for canning, fermenting, or dehydrating, the effort leads to considerable convenience down the road. A weekend of prep work while listening to your favorite tunes will result in a pantry filled with delicious fermented foods, jams, and snacks that you’ll enjoy for months down the road. Simply open the jar, and delight in the fruits of your labor.
Health. Fermented foods are known to enhance digestive health with their rich stores of probiotics and preserved nutrients. Research shows that fermented foods boost the immune system and may spur weight loss. Dehydrated fruits and vegetables retain their nutritional value without reliance on refrigeration or chemical preservatives. And when you preserve your own jellies and jams, you can control the ingredients you add to the jars — including the type and amount of sugar.
Thrift. Purchasing foods like preserves, dried fruits, and your fermented favorites at your local grocery store comes with a heftier price tag than the homemade equivalent. Once you perfect your recipes, you’ll be able to make large quantities to store for the off-season. You can even gift your specialty jellies, jams, sauerkraut, and kimchi for special occasions.
No matter which methods you try, research the process thoroughly, depending on the food involved, and follow important safety instructions to ensure the foods won’t spoil.

Fermented Foods
The process of fermenting foods is generally the same today as it’s always been. It begins with grated, chopped, sliced, or whole vegetables that are placed in a brine of salt and water and left at room temperature for a period of time.
Soon, beneficial lactobacilli proliferate, producing antibiotic and anti-carcinogenic substances, helpful enzymes, and — most importantly — lactic acid, the main by-product that perfectly preserves fruits and vegetables and promotes the growth of beneficial gut bacteria.
To ferment foods, you’ll need:
- Mason jars with lids or a fermenting crock
- Filtered water
- Sea salt
- A sharp chopping knife
You can ferment nearly any vegetable, from cauliflower and carrots to radishes and Brussels sprouts. If you want to be fancy about it, do a search on the term “vegetable fermentation kit.” This set will include specialty salts, labels, twine for wrapping jars, and other accessories that’ll enhance your preparation process. The following fermented foods are some of the most popular enjoyed by people from all cultures.

Sauerkraut: Sauerkraut, aka fermented cabbage, has been enjoyed by hungry eaters for more than 2,000 years. The probiotics that develop with the fermentation process are crucial for good digestion — these ‘good bacteria’ effectively keep the bad bacteria in our guts in check. Here are some homemade sauerkraut recipes for you to explore:

Kombucha: A sweet fermented tea, kombucha is also rich in probiotics that are great for your digestive tract. There is evidence that drinking kombucha can reduce symptoms of bowel inflammation and irritable bowel syndrome. There’s lots more in our post, What is Kombucha, and Why Should You Be Drinking It? And explore these DIY recipes if you’d like to learn to make your own:
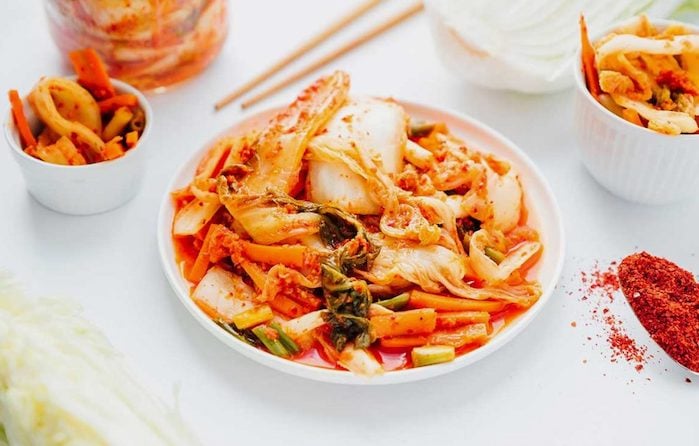
Kimchi: Kimchi supports optimum digestive health, immunity, and heart function. There is evidence that kimchi can help lower bad LDL cholesterol, which is essential for maintaining optimum cardiovascular health. Here’s an easy to follow tutorial on how to make kimchi and 11 delicious recipes for using kimchi.

Tempeh: A fermented soy product, tempeh is a great meat alternative. High in protein, it’s easy to digest and loaded with essential vitamins and minerals. While most people don’t make their own, it’s a good food to have in your repertoire. This site has plenty of easy and tasty recipes using tempeh. For the truly adventurous DIY spirits, here’s a tutorial on how to make tempeh.

Yogurt: Yogurt is widely available in the supermarket, but it’s so easy to ferment at home, where you can control the sugar content and also make it vegan using plant-based milk. Yogurt is filled with those digestion-supporting probiotics that keep bad bacteria and fungi like candida in check. Here are a few recipes for homemade vegan yogurt:
Once you make these fermented foods, you’ll need to store them properly. While fermented vegetables don’t need to be refrigerated until the jars are opened, foods like kefir and yogurt should be stored in the refrigerator.

Dehydrated Foods
Dehydrated foods are a breeze to make when you have a food dehydrator — and some air fryer models also come with a dehydrating setting — but you can also use your oven. Dehydrating preserves the flavor and nutrients of foods, which can be stored unrefrigerated in airtight containers, such as glass jars or freezer bags.
- Dehydrated vegetables to use later can simply be rehydrated in a soup or stew. Vegetables you can dehydrate include mushrooms, onions, garlic, carrots, tomatoes, and peppers.
- Dehydrate herbs like oregano and thyme to flavor dishes once the herb garden is frozen over.
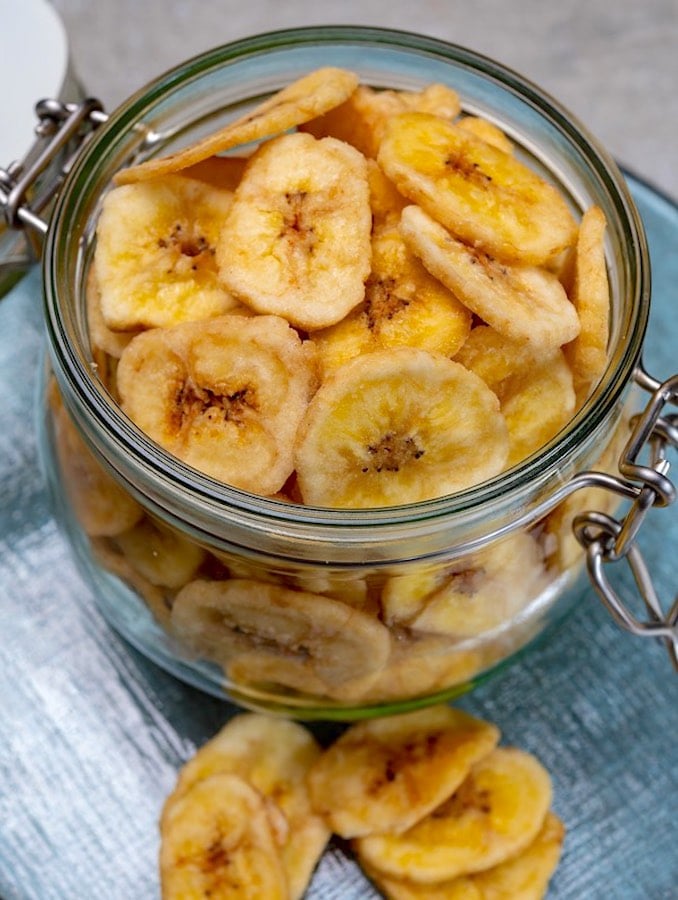
- For tasty snacks, dehydrate fruits like bananas, apples, apricots, peaches, plums, and grapes.
To dry your foods with a food dehydrator or air fryer, follow the directions that come with your machine. Each brand comes with its own specific, helpful documentation to help you get the best results.
To dehydrate in a regular oven, follow these steps:
Prep is the most important step in dehydrating foods. Choose foods that are in their prime.
- Soak fruits and vegetables in a 1:1 mixture of lemon juice and water to prevent them from turning brown.
- Thoroughly wash (and peel, if necessary) fruits and vegetables. Cut them into uniform, ¼-inch slices. Use a mandolin for the best results.
- Set your oven temperature to 200 degrees F if that’s the lowest temperature setting. Otherwise, the optimal temperature for dehydrating most foods is 120 to 140 degrees F. If your oven has a “warm” setting, use that.
Low and slow is the name of the game for dehydrating your favorite foods. At the low temperatures required for successful dehydration, expect the process to take anywhere from six to 10 hours.
- Place the foods on top of wax paper on a cookie sheet.
- Flip the food and mix it up several times throughout the drying process to ensure even drying.
- Check the progress every couple of hours. When it’s getting close, check it every half hour. Drier foods, like bananas and apples, take less time, while juicier foods, like grapes and tomatoes, take longer. If the food is still moist or sticky, it’s not done drying.

Jams, Jellies, Preserves, and Marmalades
Delicious on bread or in sandwiches, homemade fruit spreads are also a treat when you add them to ice cream and other desserts. The four most common types of DIY fruit spreads are made similarly, but they’re different in key ways.
- Jam is made with fruit that’s been mashed up, and it’s firm enough to spread on toast.
- Preserves use large pieces of fruit — or the whole fruit, if it’s small, like blueberries.
- Marmalade is a preserve made with citrus fruit.
- Jelly contains no fruit, but is made from the juices of fruits like grapes and apples, which don’t break down very well.
Store-bought jams, jellies, marmalades, and preserves are generally high in sugar and other unwanted ingredients — and quality options are expensive. When you make your own, you get to control all of the ingredients and use recipes that are designed to please your taste buds.
The process to make these tasty spreads is simple, but the recipes are as varied as the types of fruits you can turn into delectable spreads. Follow your particular recipe, keeping these tips in mind:
- Thoroughly sanitize jars and lids by placing them in boiling water for a few minutes before you fill them.
- Wash fruit under cold running water — don’t soak it!
- Remove the pits, cores, peel, or stems if necessary.
- For jams, cut or mash the fruits. For preserves, use whole fruit, or cut it into big chunks. For jelly, prepare the fruit according to the recipe.
- For a smoother jam and jellies, stir continuously to break up the fruit.
- To check for doneness, dip a cold metal spoon into the boiling concoction, and turn the spoon on its side. If the liquid forms two drops that flow together and hang off the edge of the spoon, it’s done!
- Skim the foam before adding the spread to jars.
- Fill the jars to the top to reduce oxygen within the jar, which can cause it to spoil.
- Seal jars and give them a bath in boiling water. Let them cool, and store them in your cabinets or pantry for up to about six months.
Here are some sources for more specific information on homemade fruit preserves:
- How to Make Basic Fruit Jam Without Pectin
- Canning 101: How to Make Jams and Preserves
- Orange Marmalade Recipe by Alton Brown
Of course, there’s the whole world of canning — fruits, vegetables, and pickles, but that’s a topic in and of itself.
As you do your research into traditional food preservation techniques, you’re sure to uncover various recipes and tips to help you become a pro in this process. After giving these preservation methods a try, you’ll find that they’re quite easy to achieve in the space of an afternoon or over a weekend, and you’ll have months’ worth of delicious food to show for it!
Am thoroughly impressed with the information on your website. Thank you for your help because am new in fermentation. Is it possible and beneficial to dehydrate fermented foods especially pre cooked then fermented ones?
Thank you for your comment, Benson. This is a contributed article, so I’m not at all expert in fermentation. This is a good question, and I’m sorry I can’t help you further; I’d suggest doing a search on the term “dehydrating fermented foods” — good luck!